Your garden facilitates an essential connection with nature that can be achieved from your very own home. Whether you’re enjoying your outside space to the full in summer, or admiring your garden view from the comfort of your living room in winter, this green gateway can transform your house by bringing the natural world directly to your doorstep.
One timeless garden feature that can completely transform this outdoor space is a brand new decking installation. Decking bridges the gap between your home and the greenery of your garden, providing you with a designated space to unwind and entertain. With the right tools and equipment it is completely feasible to install your decking yourself – read on for a step by step guide to laying your timber decking.
Equipment & Materials Checklist
Before you embark on your decking project, you need to make sure that you have all the tools and materials to hand that you will need. This can help you to stay on schedule and more importantly on budget as you complete the installation process. Your equipment needs will vary depending on the installation method you choose to follow, but some standard tools and materials that we suggest are listed below.
Essential Tools:
- Tape measure & spirit level
- Drill
- Hammer
- Screwdrivers
- Jigsaw & mitre saw
- Workbench
- Protective gloves
Essential Materials:
- Weed control fabric
- Timber for your framework
- Timber for your stakes
- Timber decking
- Slabs
- Decking screws
- Nails or nail gun clips
- Wood preserver
- Finishing stains, paints or oils
Your Step By Step Guide
How you install your timber decking will vary depending on the size of your project and your desired end result. Like any DIY project, there are also numerous ways in which you could approach this task, so it is important to do your own research before following a singular step guide. You should also be aware of your own skill level when it comes to home improvement projects, where you must always enlist professional support if necessary.
1. Preparing The Ground
The first step in the decking installation process is to ensure that your ground is properly prepared. If you are adding decking to a patio or concrete foundation, then this will provide you with a ready made solid base. If you’re installing decking over a lawn, then you will need to remove the turf and dig out the soil to around 5 cm depth. The ground should then be covered by weed control fabric weighed down by shingle or gravel. You can mark out the decking area using pegs and string.
2. Installing A Wall Plate
If your decking joins onto the external wall of your house, then you will need to add a wall plate to your installation. Mark a line where the corner of the decking will sit, where you can fit one end of your wall plate against this line. Cut your joist to the required length and drill pilot holes into the wood at appropriate distances. Drill these holes and place the wall plate into position. Push wall plugs into your drilled holes and then position the wall plate against the wall.
3. Building A Decking Frame
You will need a decking frame if your installation is going to be longer than your decking joists. Join up your joists by measuring and cutting your timber to the required length. Using measured guidelines, drill pilot holes to secure the joists, remembering to countersink your screws if you plan to use fascia boards. Move the joist into position and fit the frame into place, making sure that your decking corners are appropriately square.
4. Adding Internal Joists
Use your external joists to measure how many internal joists you will need, making a mark at 4 cm intervals. Offset your pilot holes to ensure your screws don’t touch, where you should then screw joist hangers to each end of your pieces. Then secure the joist to the frame, making sure that each end is flush with the exterior. Drill pilot holes to attach each internal joist, which can then be further secured with additional screws and joist hangers.
5. Adding The Noggins
A noggin is a short piece of timber that fits between your internal joists, where these are designed to provide additional support to your decking frame. Ensure that you are staggering your noggins properly, where you should make sure they are no further than 12 cm apart. Fix the noggins so that they are level with the top of the joists, after which you can then secure these with pilot holes and external timber drive screws.
6. Laying Your Timber Boards
To ensure a smooth finish for your decking, it is recommended that you pre-drill all your holes and countersink your screws throughout. Aim to screw into the second groove from the edge, repeating at both ends and then at intervals down the board. Make sure you have a small expansion gap of around 5 to 8 mm between boards, where you can keep this in place using a spacer piece. You may need to cut bespoke board shapes to fit around your garden, in which case you should always draw out a measured template before sawing your timber. For a finishing touch, you may wish to add fascia boards to smooth out any exposed edges or corners.
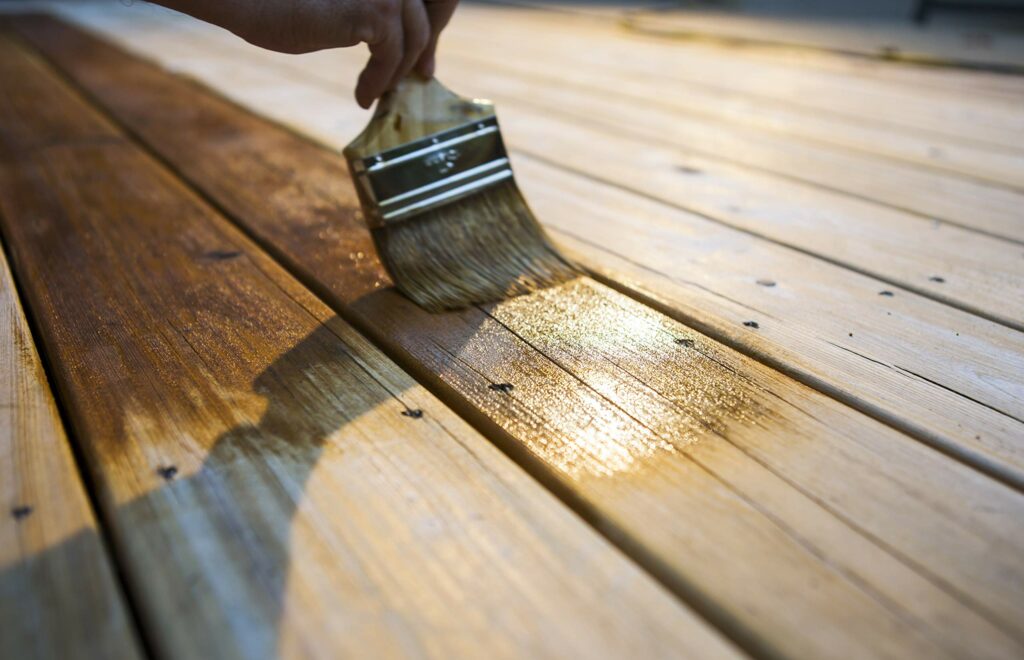
Finishing & Decorating Your Decking
Once all your installation work is complete, you will then need to think about how you will finish and protect your timber decking. Applying a sealant can help to waterproof your wood, preventing cracks and warping down the line. An appropriate stain or wood oil could also be useful if your decking is made of expensive hardwood, where these finishes can draw out the natural colour and grain of your materials. You may also wish to sand and paint your decking, where you should always use an appropriate outdoor wood paint designed to endure external weather conditions.
The rest of the decorating process is entirely up to you, where it may be helpful to consider what you’d like to use your decking area for. If you’re hoping to create a space to unwind then comfy outdoor furniture and fairylights are a must. You may also wish to use your decking area to entertain, in which case you could invest in a barbecue, cocktail bar or outdoor heater unit. Planters and hanging baskets are also a great way to blend your decking installation into the rest of your garden, helping to create a cohesive outdoor look.
Hales Sawmills: Timber Decking Boards & Landscaping Supplies
At Hales Sawmills, we can provide you with all the wood you need to complete your decking installation, where our goal is to help you to create your ideal garden landscape. We supply a comprehensive selection of decking boards, posts and spindles to get your project off to the best possible start. We also offer a broad array of decking cleaners, stains and oils so you can achieve the perfect finish. Add from our range of garden furniture, planters and decking accessories to create an exemplary extension to your home through which you can unwind and entertain.
In addition to this, our range extends to garden gates, protective fences and sawn timber, meaning we can cater to you whatever your wood requirements may be. Beyond wood, we also have everything you need to embark on a complete garden makeover, whether you’re looking for heavy duty ballast, bird feeders or an outdoor dog kennel. We supply a high quality range of gardening tools and equipment including compost, plant food and lawn care accessories, so you can keep your greenery looking just as good as your timber.
Beyond this, you can ensure that you’re tackling your DIY project safely with our range of protective clothing and footwear, which includes waterproof jackets, safety gloves and ear defenders. Get in touch with us directly today to find out more about our complete range of decking products, or to enquire about our wider selection of garden and DIY accessories. You can also visit our timber treatment page to learn more about taking care of your wood.